
| Getting Started | ||
|
Start the program by double clicking on the “Coggins
Secretary” icon located on your desktop. A welcome screen will appear showing the progress of the program loading. | ||
Top
|
Trial Version | ||
|
When a newly installed version of Coggins Secretary is run,
it will be limited to a 30 day trial period, starting on the day
it was installed. After 30 days the program will not run until a
registration code is entered. You can find out how many days
remain in you trial period by selecting “Help” from the
main screen menu, then select “About”. Remaining days
are also displayed on the information bar at the bottom of the
main screen. When you purchase the program, you will be sent a
registration code which can be entered. Once a valid registration code is entered, the trial period will be removed. The Registration code can be entered by selecting “Help” from the main screen menu, then selecting “Registration Code”. | ||
|
Logging In | ||
|
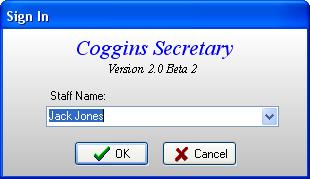
After the program starts, it will check
for Veterinarians that have been entered. If none are there, you
will be prompted to enter information for the first veterinarian
in the system. If more than one veterinarian exists in the
program, the program will have you pick which one to use during
this session. If only one veterinarian exists, the program will
assume this is the one you want to use. Once the login procedure
is complete, you will be brought to the Main Screen. |
| |
|
Main Screen | ||
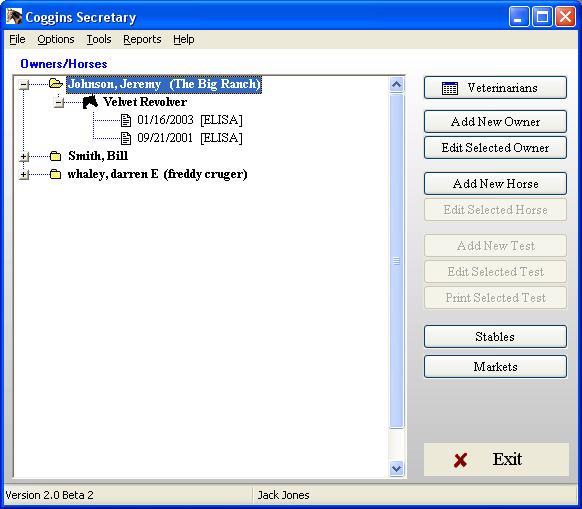 On the Main Screen you will see a list of owners. Clicking the + next to the owner will open a list of that owner's horses. Clicking the + next to a horse will open a list of that horses' tests.
The information bar at the bottom of the main screen displays the current veterinarian. | ||
|
Veterinarians | ||
|
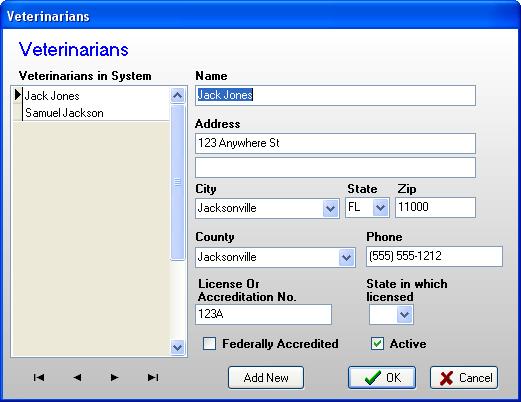
Adding a Veterinarian: From the main screen, click “Veterinarians”. This will bring you to the Veterinarians screen.To add a new veterinarian, simply click “Add New Vet”. The veterinarian name will automatically default to New Vet. Just fill in all the information for the new veterinarian. When done adding, click “OK”. Editing a Veterinarian: From the main screen, click “Veterinarians”. This will bring you to the Veterinarians screen. On the left is a list of veterinarians in the system. The information on the right pertains to the currently selected veterinarian in this list. All veterinarian information can be changed from this screen. When done editing, click “OK”. Clicking “Cancel” will cancel any changes made to the current veterinarian. If you are in the process of adding a new veterinarian, it will be deleted following confirmation that you wish to cancel. |
| |
|
Owners | ||
|
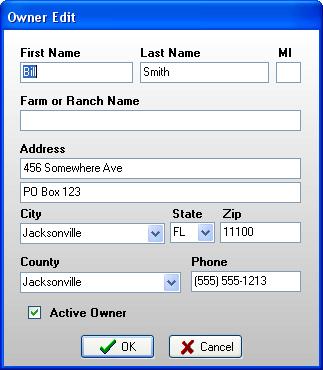
Adding Owners: From the main screen, click “Add New Owner”. This will bring you to the Edit Owner Screen. The owner name will default to New Owner. Enter all information pertaining to the new owner. When done, click “OK”. Clicking “Cancel” will delete this owner after confirmation. Editing Owners: From the main screen, select the owner you wish to edit by clicking on his/her name. Then Click “Edit Selected Owner” or you can simply double click on the owner’s name. This will bring you to the Edit Owner screen. All information pertaining to the selected owner will be displayed. You may change any or all information. When done click “OK” and changes will be saved. Clicking “Cancel” will cancel any changes made. Deleting Owners: From the Edit Owner Screen, you can delete the selected owner by clicking “Delete Owner”. If an owner has horses entered in the system, you will not be able to delete. You can make an owner “Inactive” by unchecking the Active Owner box. Doing this will prevent the owner from being displayed on the main screen. To reactivate an owner, simply edit that owner and check the Active Owner box. |
| |
|
Horses | ||
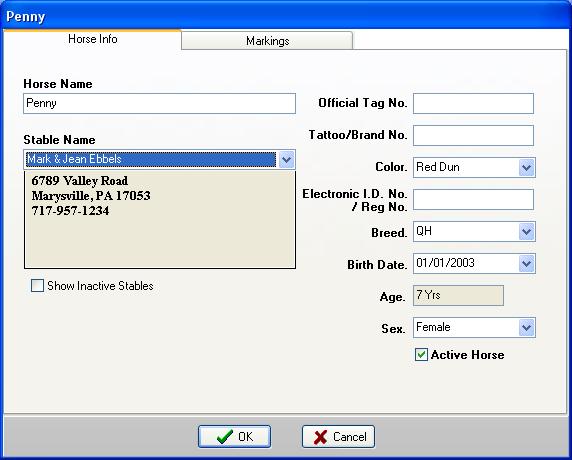 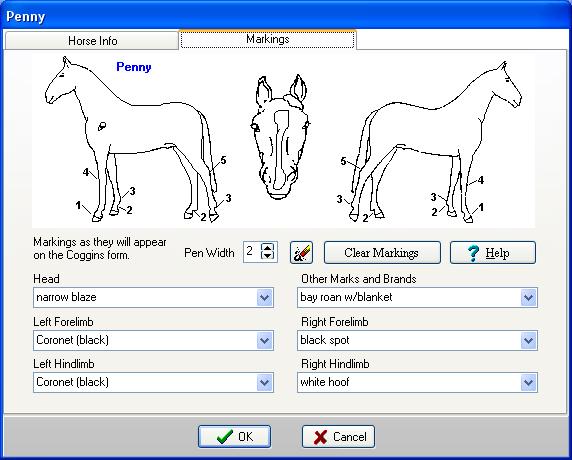 Adding a Horse:
From the main screen, Select the owner you wish to add a new horse to then click “Add New Horse”. This will bring you to the Edit Horse Screen. You will notice two tabs at the top of the screen, “Horse Info” and “Markings”. When you first get to this screen, the “Horse Info” tab will be active. The horse name will default to “New Horse”. The stable information will default to the owner. If the owner is not currently listed as a stable in the system, you may add it by clicking “Add to stable list”. This will make this stable available to other horses via the Stable list. Enter all information pertaining to the new horse. If you wish to use a different stable, simply dropdown the Stable list and select an existing stable or add a new one. By checking the “Use Inactive Stables” box, the stable list will show you all stables including those flagged as inactive. If this box is not checked, the stable list will only include active stables. You can make an horse “Inactive” by unchecking the Active Horse box. Doing this will prevent the horse from being displayed on the main screen. To reactivate a horse, simply edit that horse and check the Active Horse box. If you click on the “Markings” tab at the top of the screen, this will bring you to the markings page for this horse. From here you can draw the horses markings directly onto the horse by holding down the left mouse button. Holding down the right mouse button acts as an eraser. If for some reason you need to start over drawing the horses markings, simply click “Clear Drawn Markings”, and all markings will be removed. While drawing, you may increase or decrease the pen width at any time. Markings drawn here are transferred directly onto the printed Coggins form. All descriptive markings for head, limbs, etc. are preset in dropdown lists. All of these fields will accept custom description typed directly in as well. Any descriptive marking entered that are not in the list, will automatically be available next time you edit a horse, thus eliminating repetitive typing. Editing a Horse: From the main screen, Select the owner you wish to add a new horse to then click + button next to the Owner’s name. This will list all horses belonging to that owner. Simply click on the horse you wish to edit then click “Edit Selected Horse” or you can double click on the horse’s name. This will bring up the Edit Horse Screen. Editing includes all of the same features described in “Adding a Horse”. Deleting a Horse: From the Edit Horse Screen, you can delete the selected owner by clicking “Delete Horse”. If a horse has Coggins Tests entered in the system, this option will not be available. Drawing: Press left Mouse Button to Draw Markings. Press Right Mouse Button to Erase Markings. Increase or decrease Pen Width to draw different thickness of lines. | ||
|
Coggins Tests | ||
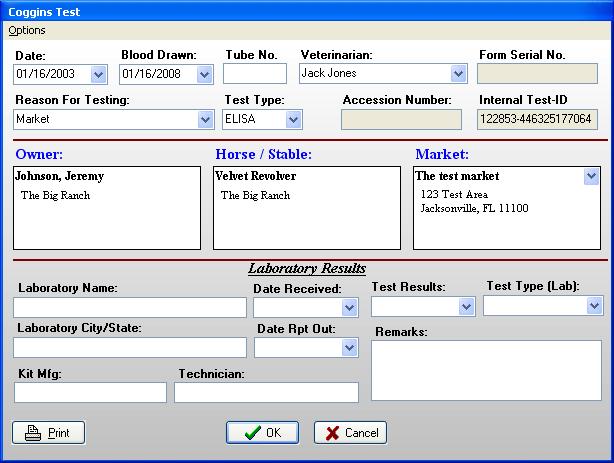 Adding a Coggins Test:
 From the main screen, Click the + button of the owner of the horse you wish to add a new Coggins test for. Click on the horse that you want to add a test for. Then Click “Add New Test”. This will bring you to the Edit Test Screen. You will notice that the test already has the Owner, Horse, Veterinarian and Dates assigned. The Signature Date and Sample Drawn Date will default to today. Both dates can be changed by typing in a new date or dropping down the calendar and selecting a date. The Veterinarian will default to the veterinarian currently logged in. To change the veterinarian just drop down the list and select the veterinarian to use for this test. All you need to enter is “Tube Number” and “Reason For Testing”. If this is a market test, check the box labeled “Market Test”. This will enable you to select a market for this test or add a new one. Clicking “Cancel” while adding a new test will cause that test to be deleted following confirnmation. Editing
a Coggins Test: Deleting
a Coggins Test: Clicking “Cancel” while editing a test will cause any changes made to that test to be cancelled following confirnmation. Information listed under horse is
Stable Information. Owner address, stable address and market
address can all be modified from this screen by Double Clicking
in the appropriate address box. | ||
|
Stables | ||
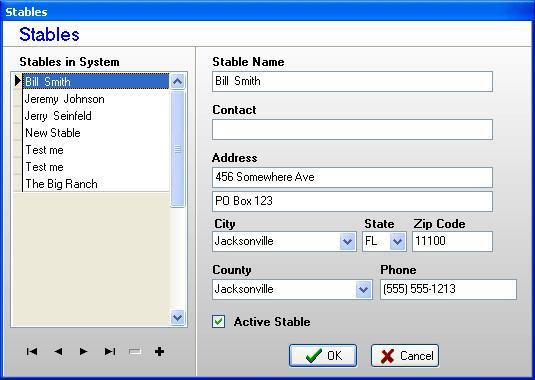 Adding a Stable:
Stables will usually be added at the time a horse is entered. However, the ability to add them ahead of time exists also. From the main screen, click “Add/Edit Stables”. This will bring up the Edit Stables Screen. To add a new stable, simply click “Add New Stable”. The stable name will automatically default to New Stable. Just fill in all the information for the new stable. When done adding, click “OK”. Editing a Stable: From the main screen, click “Add/Edit Stables”. This will bring up the Edit Stables Screen. On the left is a list of stables in the system. The information on the right pertains to the currently selected stable in this list. All stable information can be changed from this screen. When done editing, click “OK”. Deleting a Stable: From the main screen, click “Add/Edit Stables”. This will bring up the Edit Stables Screen. On the left is a list of stables in the system. Click on the stable you wish to delete, then delete it by clicking “Delete Stable”. You can make a stable “Inactive” by unchecking the Active Stable box. Doing this will prevent the stable from being displayed in the stable list when you are editing a horse. To reactivate a stable, simply edit that stable and check the Active Stable box. Clicking “Cancel” will cancel any changes made to the current stable. If you are in the process of adding a new one, it will be deleted following your confirmation that you wish to cancel. | ||
|
Markets | ||
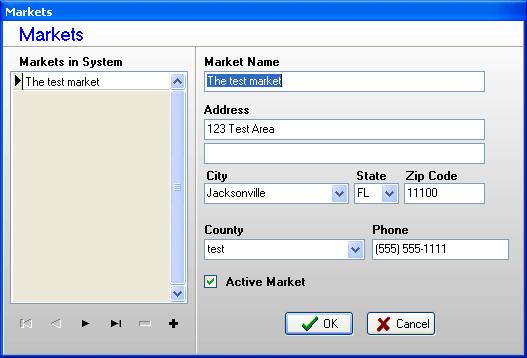 Adding a Market:
Markets will usually be added at the time a test is entered. However, the ability to add them ahead of time exists also. From the main screen, click “Add/Edit Markets”. This will bring up the Edit Markets Screen. To add a new market, simply click “Add New Market”. The market name will automatically default to New Market. Just fill in all the information for the new market. When done adding, click “OK”. Editing a Market: From the main screen, click “Add/Edit Markets”. This will bring up the Edit Markets Screen. On the left is a list of markets in the system. The information on the right pertains to the currently selected market in this list. All market information can be changed from this screen. When done editing, click “OK”. Deleting a Market: From the main screen, click “Add/Edit Markets”. This will bring up the Edit Markets Screen. On the left is a list of markets in the system. Click on the stable you wish to delete, then delete it by clicking “Delete Market”. If a market has been used in a Coggins Test, you will not be able to delete. You can make a market “Inactive” by unchecking the Active Market box. Doing this will prevent the market from being displayed in the market list when entering a test. To reactivate a market, simply edit that market and check the Active Market box. Clicking “Cancel” will cancel any changes made to the current market. If you are in the process of adding a new one, it will be deleted following your confirmation that you wish to cancel. | ||
|
Printing Coggins Tests | ||
|
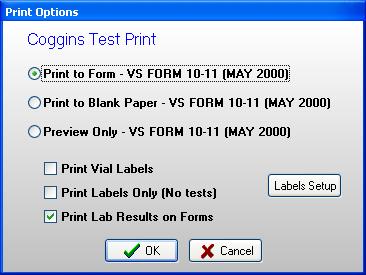
You can print one or many coggins forms in a single pass.
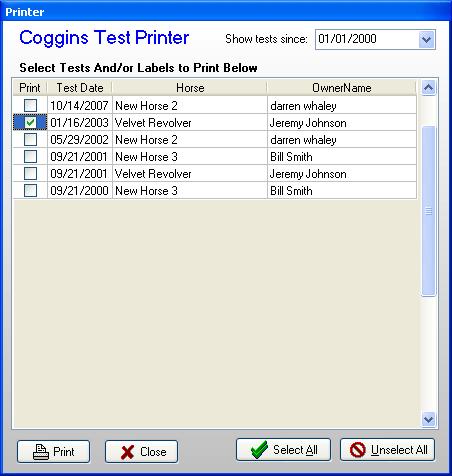
Printing a single test: Right click on a test and select "Print Test" or while editing a test, simply click “Print” to print the form. You will have the option to print directly to a pre-printed form or have the program create the form for you. Or you can simply preview what the printed form will look like. Printing multiple tests: From then main screen click “Options” from the menu at the top of the screen. From the menu select “Print Coggins Tests”. This will bring up the Coggins Printer Screen. Selecting a date will list all tests taken since and including that date. Next to each test listed is a check box. Simply check the box to print that test. All tests are checked by default. When you have selected the test, just click “Print”. As when printing a single form, you will have the option to print directly to pre-printed forms or have the program create the forms for you. Or you can simply preview what the printed forms will look like. Top |
| |
Top
|
Setting Preferences: | ||
|
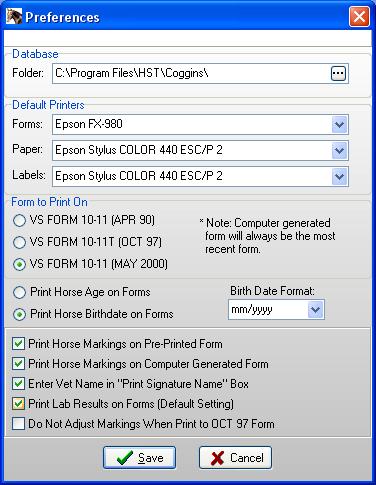
To set default preferences, click “Options” from
the menu at the top of the screen then click “preferences”.
The options on this screen are described below: Database: From here you can select the location of the Coggins.mdb file. You will need to restart the program after changing this. Default Printers: From here you can select the default printers for different print jobs. Form to Print On: Here you select the form that you wish to print to. Note: Any time the program creates the form, it will always be the most recent form. This option only applies to printing directly on a form Horse Age or DOB: Here you can select wether a horse's age or birth date will print on the form. If you select Birthdate, you can also select the format in which it prints. Print Horse Markings on pre-Printed Forms: This option only applies when printing directly onto a form. Print Horse Markings on Computer Generated Forms: This option only applies when previewing or when the computer creates the form. Enter Vet name in Print Signature Box: The program will automatically enter the vet’s name in this box when this option is selected. Print Lab Results on Forms: Select this to have Lab results print on your forms. This is a default setting only. You will have the option to change this when you print. Do Not Adjust Markings When Print to Oct 97 Form: This is provided for backwards compatibility. Older versions (prior to 2000) used the Oct 97 form as a template. |
| |
For questions please contact: support@hs-technologies.com
Copyright 2000, 2024 - HS-Technologies